Last week I made a scrap lumber chalkboard and committed to doing one scrap lumber project a week until my sizable scrap lumber supply (some say hoard, I call it supply!) is significantly reduced! The three rules for these projects are it has to be useful, it has to use only the lumber left over from other projects and it can’t take an astronomical amount of time.
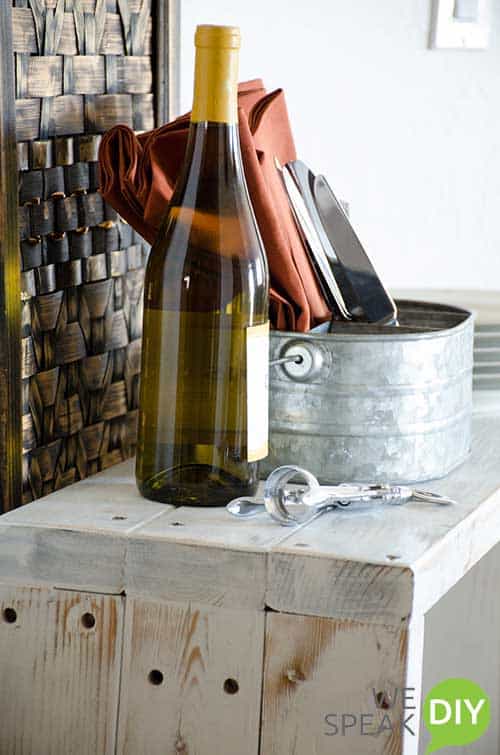
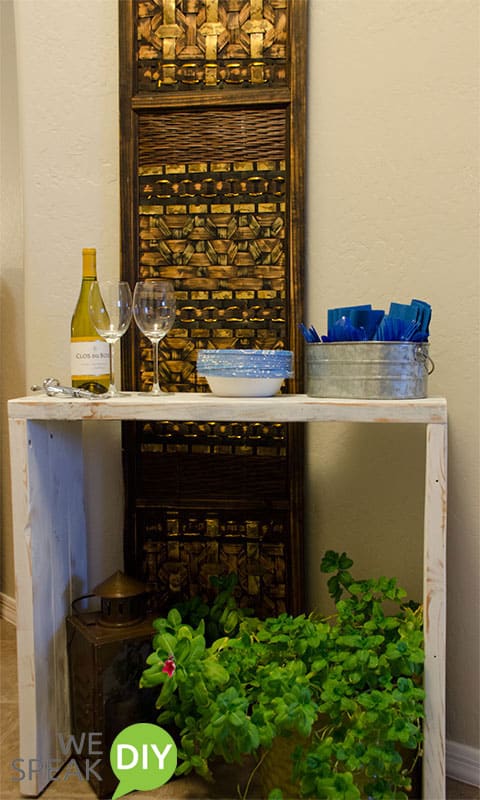
Even though the week is technically just beginning, I built this yesterday and didn’t get a chance to post it until today! So last week’s scrap lumber project is a simple outdoor console table! You can use it as additional outdoor serving space, an outdoor bar or just to display plants. It’s really versatile!
This time I used lumber I’ve had for over three years! The 2X4s were part of a huge workbench that was in our garage when we bought the house. It took up so much space! Finally, after living with it for two years, we took it apart. I couldn’t bear to throw away the wood so it went into the “someday” pile! Someday finally arrived (for some of it).
Some of the pieces had holes in it from bolts. Initially, I was going to cut away around the holes and the banged up parts of the wood…but I wouldn’t have had enough to build anything if I did that. So I needed to build something that celebrated rather than tried to remove the history of the lumber. It is so simple and easy to make. It took longer to paint than to make the table! Here goes:
(This post contains affiliate links. For more information, please read my disclosure page.)
Materials I used:
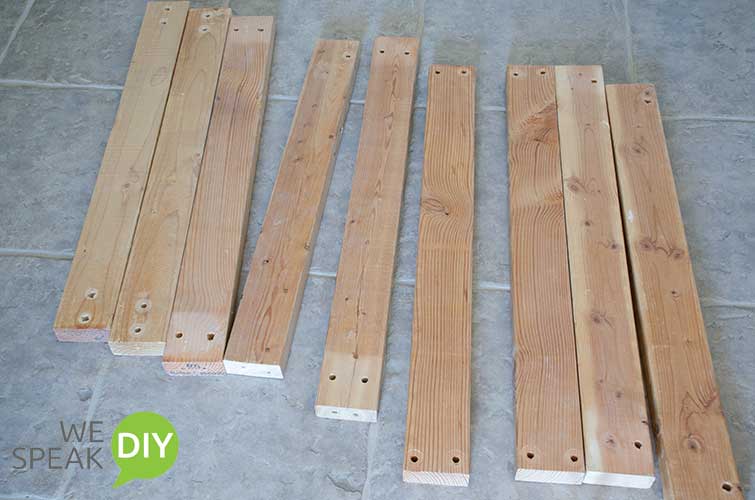
- 9 pieces of 2 X 4 lumber (3 pieces cut to 32 inches for the top and 6 pieces cut to 26 inches for the sides)
- 48 2 ½ kreg pockethole screws
- 48 pockethole plugs
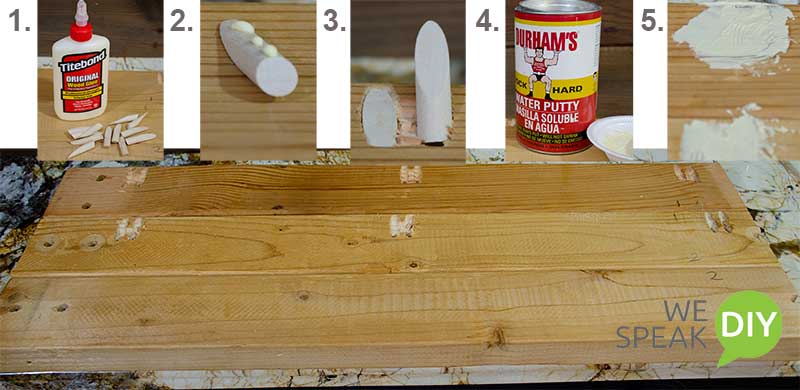
- Wood glue
- Wood filler
- Polyurethane
- Paint
Tools I used
- Makita orbital sander
- Kreg pockethole jig
- Hichati miter saw (to cut wood down to size)
- Drill
First, I cut all my lumber to the sizes needed based on the wood I had available and the space I wanted to use it in. The top of my console table is 32 inches and the legs are 26 inches. The top of the table sits on the legs so the total height of the table is 27 ½.
Next I laid the lumber in the pattern I wanted to use it. Then I numbered the sides so I’d know exactly where I wanted to drill my pocket holes (just like I did on our pantry countertop).
This entire table is put together with pocket hole screws. Even though you can see both sides of the legs, since it’s painted and going outside, I just filled in the pocket holes with wood pocket hole plugs and wood filler.
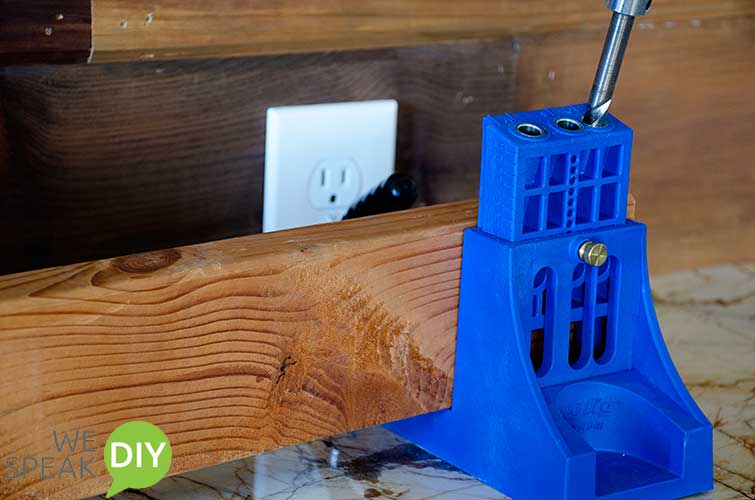
I used my Kreg jig to make all the pocket holes. If you haven’t used a Kreg jig before, this video gives a great explanation of how it works. First I attached three of the 26-inch 2X4s to make one of the leg. Then I repeated that step to make the second leg. Finally, I attached the three 32” 2X4s to make the top. At this point I had three pieces – two legs and a top. Next I plugged the pocket holes with pocket hole plugs.
If this piece was for indoors and the holes were in a place that wasn’t visible, I wouldn’t have used the pocket hole plugs. But you can see the holes in the legs of the console table and it’s going outside! We live in Arizona by the mountains and I’m not trying to give any little, nasty critters a home to hide in! So holes plugged!
Some of the plugs didn’t completely fill the holes so I filled the remaining space with wood filler! I let it dry overnight. The next morning, I used pocket holes to attach the legs to the top.
Then came the sanding! I’ll say it again…I hate sanding! After sanding, I painted and distressed the entire table. I liked the way our simple countertops turned out, so I used the same method with different paint colors. This time I used iron mountain (Sherwin William) as the base coat and plain white at the top coat, both in Behr paint. I only layered the top, the bottom is just the white.
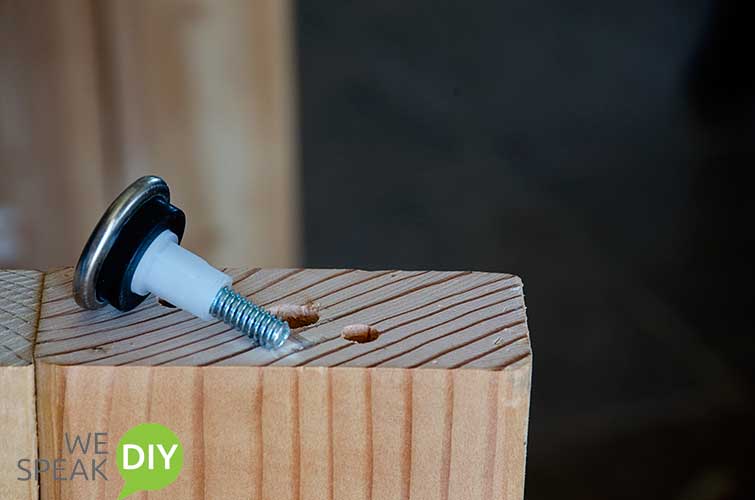
This lumber was not perfect by any means! Some of it was a little warped, nothing was perfectly straight. So to make sure the table was level, I just installed furniture leveling feet – they only cost around $3.00 for a set of four. They not only allow me to make sure the table is level, since this console table goes outside they also keep the wood from getting wet when the concrete is damp!
Finally, a coat of polyurethane and it’s a wrap. I love the way this table looks and how simple it was to make.


I love this! This is such a great use of extra lumber and it’s cute to boot! Nice work!
Thanks Megan…glad you liked it!