• About
    • Hi! I’m Teresa
    • Privacy Policy
    • Disclosure
  • Blogging Resources
  • Contact Me
  • Nav Social Menu

    • Facebook
    • Google+
    • Instagram
    • Pinterest
    • Twitter
We Speak DIY

We Speak DIY

  • Home
  • Blog
  • Build
    • Home renovation
    • Re-purpose
    • Scrap Lumber Projects
  • Craft
    • Paint
    • Sew
    • Seasonal
      • Birthday
      • Christmas
      • Fall
      • Halloween
      • Spring DIY
  • Decorate
    • Inspiration
    • Mood Boards
    • Seasonal
      • Birthday
      • Christmas
      • Fall
      • Halloween
      • Spring
  • Clean
  • Organize
  • Seasonal
    • Birthday
    • Christmas
    • Fall
    • Spring
  • Shop

October 21, 2016 · 2 Comments

DIY STRONG FLOATING SHELVES

Home renovation· House and Home

I am so excited about the way the pantry is coming together!  It’s amazing when the vision you have in your head for a space actually starts becoming a reality.  I’ve finished the three floating shelves for the pantry and I can’t wait to share them with you.  I am really happy about the way they turned out!

Floating Pantry Shelves

These floating shelves had three requirements. They had to be strong because I planned to put a lot of heavy stuff on them, they had to be thick  and they had to be attractive.  The internet is your best friend when it comes to pulling together ideas for a project.  There are different ways to build floating shelves – I chose to go with what seemed to be the easiest way to get the strongest shelves!   It isn’t really that difficult to get these beautiful shelves!

The pantry gets no natural light and it’s really hard to get good pictures with the light on.  But I think they’re important to help you get a visual of the project so I included them!

Materials Needed for Three Floating Shelves

(You need to adjust the measurements to fit the size of your shelves) My shelves measure approximately 97 inches long, 15 inches deep and 3.5 inches thick.  All of my wood cost around $132.90 or 44.30 for each shelf.  I think that’s a pretty good price for these long, sturdy shelves!

  • 9 – 2″ x 3″ x 8′ pine or whitewood board @ $2.60 each
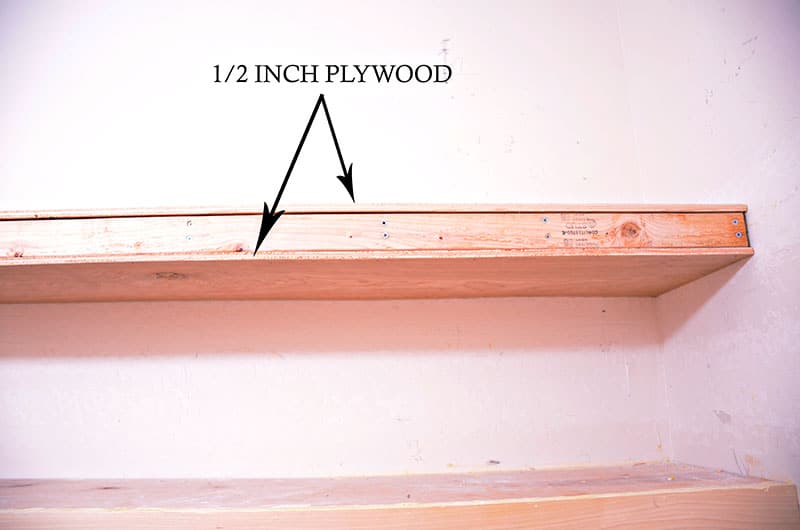
  • 3 pieces of 1/2″ hardwood plywood material @ $25.00 each –  Because I wanted my shelves to be 15 inches deep, I had the plywood cut into 14 inch strips.
  • 3 – 1″ x 4″ x 10′ select pine or whitewood boards @ 11.49 each
  • Brad nailer
  • 3.5″ spax wood screws to screw frame into the studs.
  • 2.5″ spax wood screws to screw supports into the front and back frame
  • Wood glue
  • Caulk if you are painting your shelves. (If you are staining, you need to make absolutely sure your measurements are precise. I’ve found that even if a caulk indicates it is stainable, there will be a detectable difference!)

Time to Put Your Shelves Together

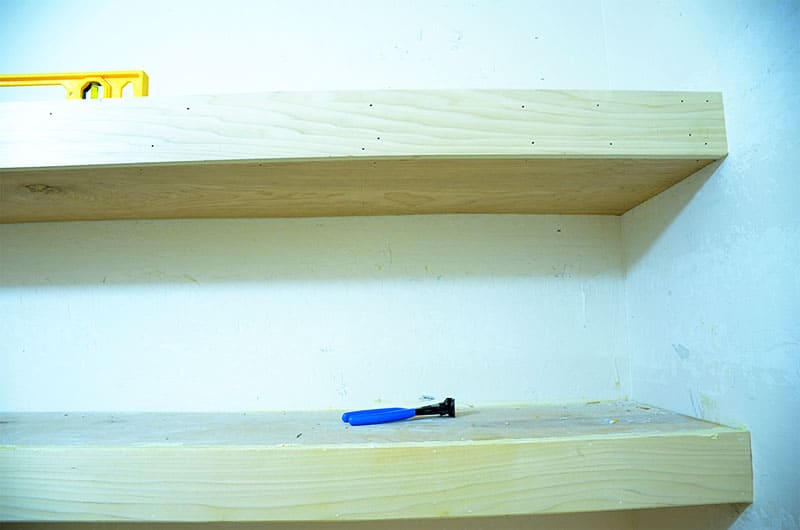
Cut your wood to size.   Each shelf uses three of the 2” x 3” x 8 boards.  One board for the front of the frame, one board for the back of the frame and one board  for the supports. Because my shelves are 97 inches and my boards are 96 inches, no cutting for these were necessary for the front and back frame.  I cut the supports 12 inches each.  Since they fit inside the frames and the depth of each frame is 1 1/2″, the total depth of each shelf is 15 inches.

supports and frames for chunky shelves

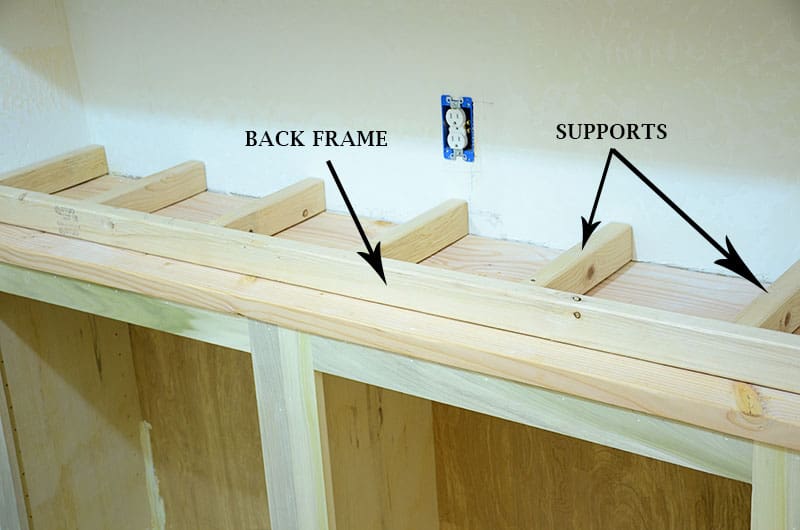
I didn’t use my Kreg jig because the frame is completely covered.  I just drilled through the front frame directly into the support.  Measure and place the supports evenly along the back frame.

building chunky shelves screw into frame

Before you add the front of the frame, attach the back frame with the supports to the wall.  Drill directly through the back frame into the studs.  I used two screws per studs and added a metal L brace on each end of the frame for extra strength.  I then drilled into the side wall directly into the studs.  Be sure to use your level to make sure your shelves are plumb before you screw into the studs.

building chunky shelves frame

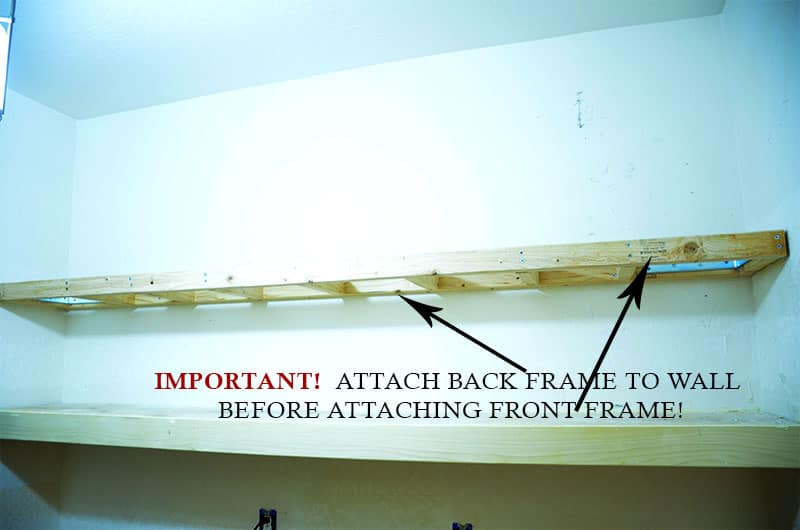
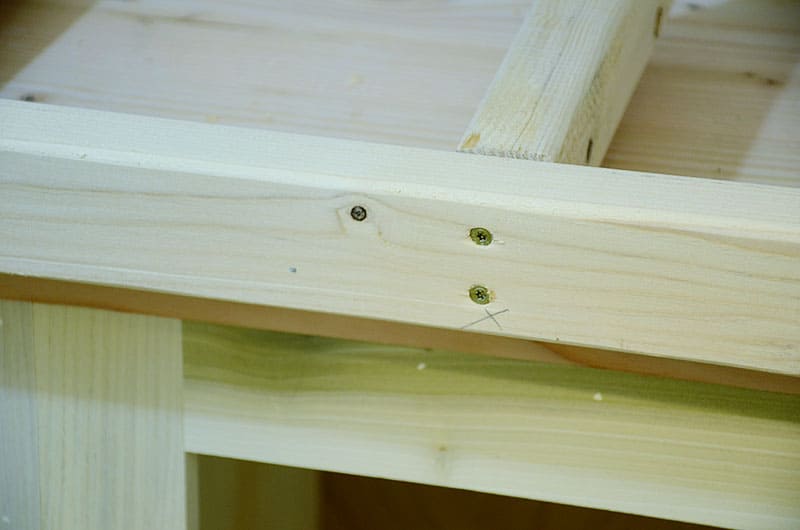
After this part of your frame is securely attached to the wall and level, attach the front part of the frame by screwing through the front frame board directly into each support.  I used two screws per support.  I checked for level each time I screwed into a support.

When Things Go Wrong (And They Will)!

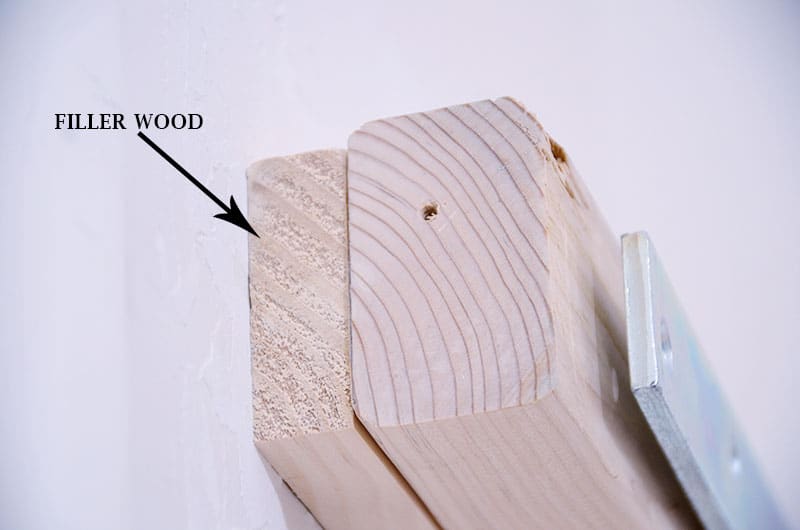
My front and back frame boards were one inch too short so I had to add a filler board at one end of the shelf.  I drilled through the end support and the filler board directly into the stud.

It’s important to remember that when something doesn’t quite work (and this will happen!) – don’t panic or get discouraged.  There are so many ways to compensate!  Keep a clear head and you will figure it out!

building shelves compensate for too short board

Add wood glue to the top of the frame and add a piece of the plywood. For the bottom of the frame, I put the wood glue on the plywood panel, then attached it using my brad nailer.

add plywood to top and bottom of shelves

Cut your 1″ x 4″ x 9′ to size.  I cut mine to 97 inches since this is the length of my shelf.  Use your brad nailer to attach it to the front of your shelf.

front board for chunky shelves

Tip:  When I need a perfect fit, I always cut my wood just a little longer than I need.  That way I can “sneak” up on the correct length.  I then cut it down by hairlines until it is perfect.  This method has never failed for me!  You can always make wood shorter but you can’t add it back once you’ve cut it off.  I got even more excited when I saw how this board made the shelves look – and that was before the finish work!

Finish it Off!

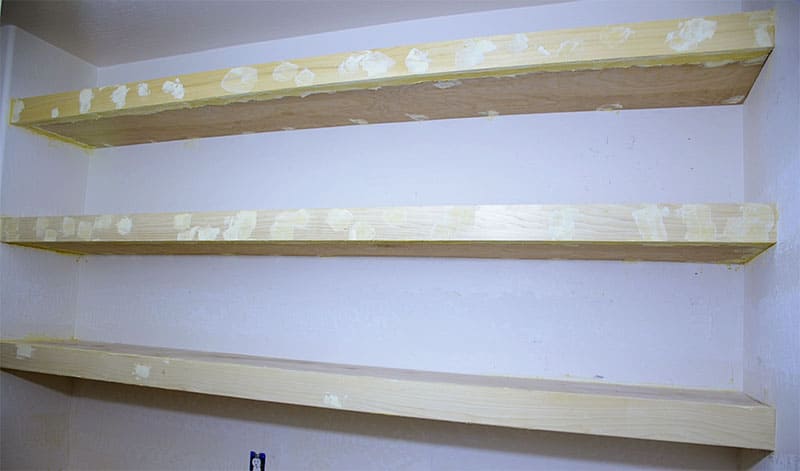
Use the filler of your choice to fill nail holes and any cracks.  I had to add a small piece of plywood at the end of each shelf because of the shortage, so I used wood filler to conceal the seam.

I actually went overboard with the wood filler and added huge amounts to make sure none of my seams showed – I wanted it to be seamless.  So guess what??  I was in sanding hell and I hate sanding!  If I had been more careful when putting the shelves together, I could have avoided a lot of the sanding.  Lesson learned!

chunky shelves ready for sanding

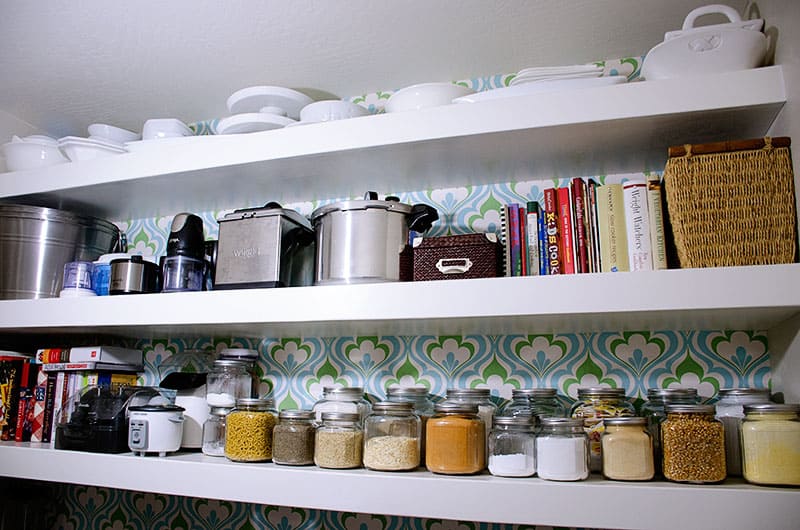
After the filler was added and the shelves sanded, it was time for paint!  My husband is the painter in our family, so when I say “we painted” I really mean “he painted!  We used Behr Swiss coffee in semi-gloss left over from painting our kitchen cabinets.  I love my new shelves!  See them for yourself.  (My pantry is not square – this wall really is angled so it’s hard to get a good picture!)

pantry-shelves

Save

Save

Save

Don’t miss out!

Previous Post: « DIY EASY BOO-TIFUL WOOD PLANK HALLOWEEN GHOST TRIO
Next Post: 11 FUN, BUDGET FRIENDLY THINGS YOU CAN DO WITH YOUR FAMILY »

Reader Interactions

Comments

  1. [email protected] says

    October 28, 2016 at 10:20 am

    Okay, #pantrygoals going on right here! Your tutorial is great and the shelves turned out awesome! Love the wallpaper, too.

    Reply
    • We Speak DIY says

      November 3, 2016 at 1:54 am

      Thanks Laura…I went a little retro with the wallpaper!

      Reply

Leave a Reply Cancel reply

Your email address will not be published. Required fields are marked *

Primary Sidebar

  • Facebook
  • Google+
  • Instagram
  • Pinterest
  • Twitter

Thanks for coming by!

Hi. I'm Teresa and like most, I wear several hats. I'm a wife, mother, friend and daughter. I love my life and the people in my life. I'm glad I get to share one of the things I love to do with you - improving my home by fixing what's broken, building what's needed, beautifying my surroundings and having fun while I'm doing it (for the most part!) I speak DIY and I'd love to talk to you!

Sign Up to Have We Speak DIY Posts Delivered Directly to Your InBox

Search by Category

POPULAR POSTS

completed plant stand

THE EASIEST DIY PLANT STAND EVER

Beautiful Pantry ideas

Beautiful Pantry Ideas That Will Inspire You

Use Craigslist Wisely - If it feels Weird - leave

HOW TO BUY AND SELL ON CRAIGSLIST SAFELY

Budget friendly family activities

11 FUN, BUDGET FRIENDLY THINGS YOU CAN DO WITH YOUR FAMILY

Latest Scrap Wood Projects

scrap wood project

Scrap Wood Project: How to Build a Chalkboard from Scrap Wood

Anyone who works with wood on a regular basis (and is a little bit of a hoarder!) knows about scrap wood.  It grows, it multiplies, it takes over spaces and it is really hard to throw away however, it just feels wrong to get rid of something that could be made beautiful!    But, I've ...
Read More about Scrap Wood Project: How to Build a Chalkboard from Scrap Wood

Outdoor bench from scrap wood

How to Build an Outdoor Bench the Easy Way

Growing up, we spent a lot of time on the front porch.  Neighbors walking by would stop to catch up on the latest gossip. Kids made a game of jumping up and down the steps. Without a doubt, our porch was a popular gathering place. My dad built that porch and all the seating that accommodated ...
Read More about How to Build an Outdoor Bench the Easy Way

Planks for Boo-tiful Halloween Ghosts Finished

DIY EASY BOO-TIFUL WOOD PLANK HALLOWEEN GHOST TRIO

Hey ya’ll!  I’ve been missing in action for a couple of weeks…had to take care of a couple of family things.  I’ve missed interacting with by fellow DIYers and I’m so glad to be back! I'm participating in some awesome link parties with several of my awesome blog sisters over the next few weeks!  ...
Read More about DIY EASY BOO-TIFUL WOOD PLANK HALLOWEEN GHOST TRIO

completed plant stand

THE EASIEST DIY PLANT STAND EVER

Let me first say that I do not have a green thumb...but I do love plants!  And I like the way plants add color and texture to our front porch.  So one of the projects for our front porch are plant stands for the plants that have the willpower to survive my planting skills.  This is the easiest DIY ...
Read More about THE EASIEST DIY PLANT STAND EVER

More Posts from this Category

Latest From Crafts

How to Make Airtight Glass Container

How to Turn Ordinary Jars into Airtight Glass Containers

Before we began working on the pantry, a hodgepodge of containers purchased over the years held all our staples. Some of them still functioned well, others…not so well! One of my pantry goals was ...
Read More about How to Turn Ordinary Jars into Airtight Glass Containers

Paint an Outdoor Rug

How to Paint an Outdoor Rug the Easy Way

About a year ago, I bought seagrass matting for our front porch. I was on a tight budget and at the time, it was the best solution I could find. But the harsh Arizona sun and heat has not been kind to ...
Read More about How to Paint an Outdoor Rug the Easy Way

Wicker chairs before and after painting

WE PAINTED OUR $7 CHAIRS – THE EASY WAY

If you’ve been following my other projects, you already know I hate to sand. Second to sanding is painting! So whenever there’s painting to be done, I call in my husband. He is the resident painter in ...
Read More about WE PAINTED OUR $7 CHAIRS – THE EASY WAY

wooden plank wall

HOW TO USE STEEL WOOL AND VINEGAR TO MAKE WEATHERED WOOD

I promised I would share the steel wool and vinegar stain I used to create the weathered wood boards used for our wood plank accent wall.  This recipe is nothing new…it’s been around for a long time.  ...
Read More about HOW TO USE STEEL WOOL AND VINEGAR TO MAKE WEATHERED WOOD

More Posts from this Category

Welcome

Stay up to date

Sponsor

Categories

Image Credit

All the images displayed in the Beloved theme are available in our shop here.

When you take a wrong turn with your partner in cr When you take a wrong turn with your partner in crime @lolitafiles and end up at your new favorite diner! #popandsonsdiner  #besties #adventures #fam #weekend
When your bread pudding is actually a mountain! When your bread pudding is actually a mountain!
I love making pizzas with my family. Our pizza ma I love making pizzas with my family.  Our pizza making is a lot like our life.  A little messy, not always pretty but delicious and a lot of fun! .
.
.
.
.
.#familytime #messytime #delicious #buildingafamily #ilovethem #bonding #trainthemyoung
When you go in search of the perfect gray for your When you go in search of the perfect gray for your bedroom walls and end up bringing home over a HUNDRED swatches!
.
.
.
.
.
.
.
#wespeakdiy #paint #bedroomwalls #perfectgrey #perfectgray #sherwinwilliams #bedroomoasis #choices  #notmyjob #honeydolist #thiswilltakeawhile
Life is what you make of it. You can complain and Life is what you make of it.  You can complain and wish for something better or you can do something.  Whether materials, relationships, businesses - make your life better...build something!
.
.
.
.
.#build #livelife #nocomplaints #makeitbetter #buildsomething #dosomething #claimit #zigziglar
Chairs and stools for the patio makeover are here Chairs and stools for the patio makeover are here from @target.  Don't you love that red- stay tuned!
.
.
.
.
#patiomakeover #backyardgoals #popofcolor #red #unboxing  #target #targetstyle🎯 #outdoordining #outdoorliving
Thanks to my better half @antoinecoffer for finish Thanks to my better half @antoinecoffer for finishing up the pergola in the hot sun!  We've already had two parties and it was a hit! Next, plans to add some color and a furniture revamp. .
.
.
.
#backyardgoals #backyard_dreams #backyardfun #summerfun #outdoorfun #backyardreno #reuse #furnitureredo #furnituremakeover #diycushions #sewyourown
This error message is only visible to WordPress admins

Error: API requests are being delayed for this account. New posts will not be retrieved.

Log in as an administrator and view the Instagram Feed settings page for more details.

Footer

All you need is love. And coffee. Must have coffee.

  • Email
  • Facebook
  • Instagram
  • Pinterest
  • Twitter
When you take a wrong turn with your partner in cr When you take a wrong turn with your partner in crime @lolitafiles and end up at your new favorite diner! #popandsonsdiner  #besties #adventures #fam #weekend
When your bread pudding is actually a mountain! When your bread pudding is actually a mountain!
I love making pizzas with my family. Our pizza ma I love making pizzas with my family.  Our pizza making is a lot like our life.  A little messy, not always pretty but delicious and a lot of fun! .
.
.
.
.
.#familytime #messytime #delicious #buildingafamily #ilovethem #bonding #trainthemyoung
When you go in search of the perfect gray for your When you go in search of the perfect gray for your bedroom walls and end up bringing home over a HUNDRED swatches!
.
.
.
.
.
.
.
#wespeakdiy #paint #bedroomwalls #perfectgrey #perfectgray #sherwinwilliams #bedroomoasis #choices  #notmyjob #honeydolist #thiswilltakeawhile
Load More... Follow on Instagram
This error message is only visible to WordPress admins

Error: API requests are being delayed for this account. New posts will not be retrieved.

Log in as an administrator and view the Instagram Feed settings page for more details.

Customized © 2023 · Create, Make, Do It Yourself by We Speak Diy